Disclosure: Some links here are affiliate links. I get a commission if you buy, but you don’t pay extra. This supports my blog and lets me share quality content. I only suggest what I trust and use. Thanks!
Introduction
Hi everyone!
As mentioned in my previous videos, after I had decided to start an online business, I went about with the monumental task of choosing a niche.
After choosing a niche, I created a brand name, logo and bought the domain name. I discussed about all these processes in my previous blog posts.
Now, with a domain name, the next task is to create a website for my business. And in this blog post, I will share with you what was the process I went through.
And How to Create a Website for Your Business.
Business 101 series
This is the 4th post of the Business 101 series. I created this series to help you learn how to start and grow and online business. As you can see, there will be more posts as listed below:
- 10 Steps to Start an Online Business
- 6 Steps to Choose a Profitable Niche
- 3 Steps to Help You Create a Brand for Your Business
- 7 Steps to Create A Website for Your Business – this article
- 8 Ways to Promote Your Website
- 7 Ways to Make Money From Your Website
- Winning the Micro Moments That Matter
Business
Would you like to learn how to start and grow an affiliate marketing business? Join my I Love Passive Income community for more tips and useful business information. Simply fill in the details below, and you will receive an email with instructions on how to join this invaluable community.
Watch Video: 7 Steps to Create A Website for Your Business
Do You Have a Website?
Today, almost all businesses have a website. It is essential for the success of a business.
A website is where people can go to 24 hours a day and seven days a week to see your business, learn about what you sell, and even buy your products online.
One way to go about this task is to hire people to build and grow your website for you. But that costs money.
So, if you are like me when I first started years ago, as a small starting business, you will be cost conscious.
As such, I looked for ways to create a website with as minimal costs as possible, preferably even for free.
Step 1 – Get Web Hosting Service
In my previous video titled 3 Steps to Create a Brand for Your Business, I mentioned about getting a domain name. As mentioned in that video, the domain name is just an online address where people can find your website.
But in order for that to happen, you need to do this first step, which is to get a web hosting service. And use the domain name to assign the website address to that hosting location.
This is so that you can build a website there, and when people type in the domain name, they can reach your website.
There are many choices of web hosting services; such as SiteGround, GoDaddy, Bluehost, etc. And that can cost hundreds of dollars.
For example, at SiteGround, the basic hosting package costs a few hundred dollars, and the higher package can cost nearly $500!
It may not seem much but it is still cost.
And I can really relate. Back when I first started doing online business, every cent counts. After all, at the start, there are no earnings from the business yet.
So, it is only logical to minimize costs as much as possible.
Step 2 – Update Your Domain Name Servers (DNS)
After you acquire the web hosting service, you will need to update the domain name servers.
When you purchase a domain name, it usually points at a default domain name server address. The domain name server address points at where your website is located at.
As such, when you acquire a web hosting service, you need to update your name servers to point at where your website is located, which is at the web hosting service.
The web hosting service will give you the name servers address. Then go to where you purchase your domain name, usually a registrar, and update the name servers you have been given.
Step 3 – Content Management System (CMS) e.g. WordPress
Decades ago, I was one of the people who dived into the Internet Marketing industry when it first started in Singapore.
Back then, there was no WordPress. Websites were designed either by hard code programming or using what was called WYSIWYG interface.
Both were a lot of fun but not easy. You will need to be able to understand programming languages and do some programming.
Today, thankfully there are many CMS like WIX, Weebly, and WordPress. I will discuss how to create your website using a CMS like WordPress. It is what I recommend to all my clients and I recommend the same for you.
CMS are systems that are designed to make it easy for users to create and update their websites, with as little programming knowledge as required.
What is WordPress?
It is a CMS that is based on open-source framework developed by tens of thousands of developers.
Today, according to the WordCamp, there are currently over 75 million sites that use WordPress. This alone tells you how popular this CMS is. And I can understand why.
It is so easy to use. The interface is very user friendly. There is a dashboard to access your pages, posts, menus, themes, plugins, etc.
Step 4 – Choose a Theme
Before we choose a theme, let me explain what it is. It is the design of your website.
The design includes how the content such as images, videos and text on your website are arranged on each web page. Also, how each page is displayed for your visitors.
For example, with a right-side bar or without. Also, how will your menu be presented.
In other words, a theme is not just a design for your website. It can set the tone, look and feel of your website.
Again, be mindful of your branding when choosing a theme. Do note that you can always change the theme at a later time. This can happen as your website grows and evolves.
But do try not to change the theme too often as this can be annoying to your faithful readers.
Step 5 – Site Architecture
For Site Architecture, some people prefer to do it before they start building the foundation of their website.
Some, like me, prefer to do it after. The sequence does not really matter.
What is important is that you attend to this task before you start adding content to your website. This is because having a site architecture is like planning how your website will be structured. And that is important to do as it will keep your website organized.
This is important for SEO as it will help search engines understand more about your website, and how the pages are organized within. Here is an example of a simple site architecture using the Daily Meditation website.
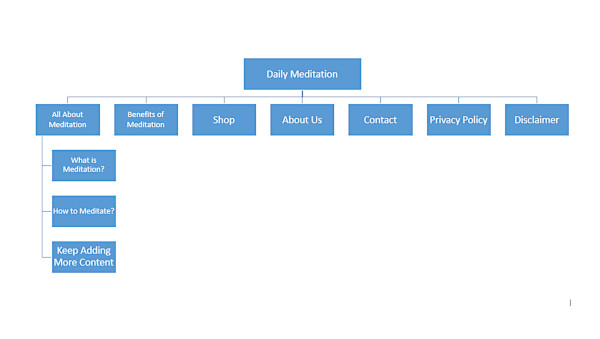
As you can see, at the top is the home page. Below it are the categories which are the topics for the content that I plan to create for the website. In addition, there are the standard pages such as About Us, Contact Us, Privacy Policy and Disclaimer pages.
Over time, as your website grows, the architecture will change. So, do remember to update it. Also, do relook at it every 6 months to see if there are any improvements to be made.
Step 6 – Add the Standard Pages First
Content is King.
I am sure you have heard this before?
What this means is that content rules the internet. Without it, there is nothing on the internet except for blank pages.
For your business, content is important because it is what your visitors will consume. It is from the content that the visitors learn about your business, who you are, what you are offering, and what products you are selling.
Content includes your branding, your marketing communications, and even your call to action in your advertisements.
You can create the content or you can hire a copywriter to do it.
What is important is that you take a look at your Site Architecture, and figure out what will be the content for each category and each page.
For a start, you should add the standard pages first. As mentioned, these are the About Us, Contact Us, Privacy Policy and Disclaimer pages.
Step 7 – Keep Adding Content
Now that the basic structure of your website is done, the next thing to do is to keep adding content. And not just any content. Add quality content.
Search engines love quality content, and will rank them high on search results.
With high ranking on search results, or even better – ranking on the 1st page, you get more eyeballs on your web pages. And most people will click on a link that is on the 1st page of search results.
As such, you get higher traffic. With more visitors, you have the opportunity to convert them into customers. As a result, you get sales and revenue.
Would you like to learn how to start and grow an affiliate marketing business? Join my I Love Passive Income community for more tips and useful business information. Simply fill in the details below, and you will receive an email with instructions on how to join this invaluable community.
7 Steps to Create A Website for Your Business
Timotheus Final Word
These 7 steps can help you get started at building your website, and also to grow it.
Where are you at in this website creation process? Let me know in the comments below. Or if you have any questions, feel free to drop it in the comments below.
I look forward to hearing from you.
And also, I look forward to your great health, wealth and success!
Timotheus
Digital Marketer, Lecturer, Amazon Bestselling Author & Cancer Survivor